Only the privileged team members will be able to manage form settings,within a Workspace.
![]() Edit
Workspace Form Settings privilege is required in order to edit
the form settings and to activate and deactivate them on the Workspace.
Edit
Workspace Form Settings privilege is required in order to edit
the form settings and to activate and deactivate them on the Workspace.
Editing Workspace Apps Settings:
The following lists the steps to edit the form settings:
Select Apps
- Manage Workspace Settings option from the ![]() dropdown displayed at the top of the screen.
dropdown displayed at the top of the screen.
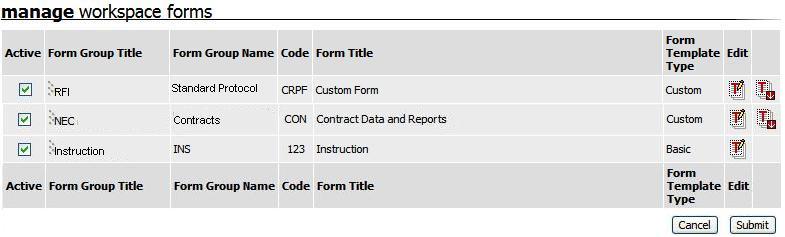
![]() A list of all the forms added to the Workspace
will be displayed as under:
A list of all the forms added to the Workspace
will be displayed as under:
Activating a Apps on the Workspace:
A form may be added to the Workspace but is available to create an instance only after it is activated on the Workspace.
To activate a form on a Workspace follow the below mentioned steps:
![]() Mark the Active
checkbox as ON for the Forms required to be activated and click on Submit
button to activate the forms on the Workspace.
Mark the Active
checkbox as ON for the Forms required to be activated and click on Submit
button to activate the forms on the Workspace.
Deactivating a Apps from the Workspace
A form can be deactivated from the Workspace so no more instances are created for that form.
To deactivate a form from a Workspace follow the below mentioned steps:
![]() Mark the Active
checkbox as OFF for the Forms which is to be deactivated from the
Workspace and click on Submit button to deactivate the forms on
the Workspace.
Mark the Active
checkbox as OFF for the Forms which is to be deactivated from the
Workspace and click on Submit button to deactivate the forms on
the Workspace.
![]() The form will not be available
for creating a new instance. The previous instances of the form will still
be available.
The form will not be available
for creating a new instance. The previous instances of the form will still
be available.
Download Form Template
![]() Click on the
Click on the ![]() icon to download .XSN file for the Custom (AppBuilder) Form type. Basic
Form type does not have .XSN file feature.
icon to download .XSN file for the Custom (AppBuilder) Form type. Basic
Form type does not have .XSN file feature.
Edit Form Template Settings
1. Click on ![]() icon against the form to change the settings.
icon against the form to change the settings.
2. Define Form Name, Form Group Code and Form Group Name.

3. Select the Form Template Type as Basic Fixed Fields if your Form has basic fields or AppBuilder if your Form has Custom Fields (having .XSN file).
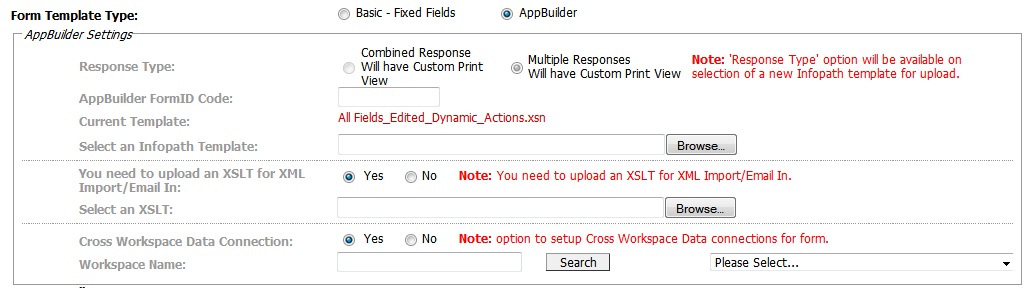
![]() Response Type: Combined
Response allows the users to view a consolidated response information
of the form messages. Multiple Response enables the users to view individual
response information of the form messages.
Response Type: Combined
Response allows the users to view a consolidated response information
of the form messages. Multiple Response enables the users to view individual
response information of the form messages.
![]() Specify AppBuilder code. Adoddle will
display a message where the same AppBuilder code is used for different
Form Types. This is to help ensure that such codes remain unique for each
project.
Specify AppBuilder code. Adoddle will
display a message where the same AppBuilder code is used for different
Form Types. This is to help ensure that such codes remain unique for each
project.
![]() AppBuilder template (.XSN) file can be uploaded via upload module. Existing
AppBuilder template is available against Current Template. Users can also
download this .XSN file by clicking on file link.
AppBuilder template (.XSN) file can be uploaded via upload module. Existing
AppBuilder template is available against Current Template. Users can also
download this .XSN file by clicking on file link.
![]() Enabling Import/Email In via excel or
XML, allows users to import data within Form instance in case of
large amount of data. For a master child workspace relation , Cross workspace
data connection allows users to specify master workspace from current
workspace. Users can search and select workspace to activate cross workspace
data connection.
Enabling Import/Email In via excel or
XML, allows users to import data within Form instance in case of
large amount of data. For a master child workspace relation , Cross workspace
data connection allows users to specify master workspace from current
workspace. Users can search and select workspace to activate cross workspace
data connection.
4. Set the User Ref option as ON to add additional user Ref to the Form.
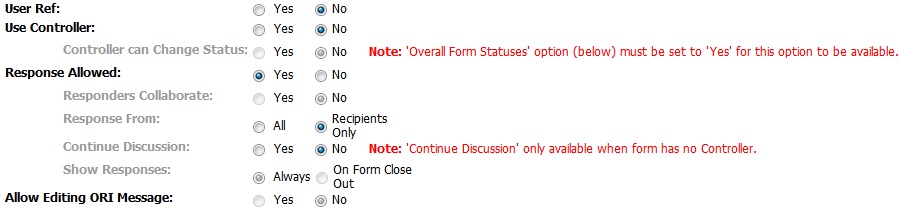
![]() Use Controller: Set this option
as 'Yes', if you want a controller to control the workflow of the Form.
Select 'No' otherwise.
Use Controller: Set this option
as 'Yes', if you want a controller to control the workflow of the Form.
Select 'No' otherwise.
Controller can Change Status: Select 'Yes', if you want controller to be able to change Form Status. Select 'No' otherwise.
![]() Response Allowed: By selecting
this option, you allow users to respond to the Form instance.
Response Allowed: By selecting
this option, you allow users to respond to the Form instance.
Responders Collaborate: Select 'Yes', if you want to allow recipients to collaborate response. Selecting Responder's collaborate as No for combined response will show the data from latest response to the users, unless handled as a part of form logic.
Response From:
All : Allow all users having access to the Form to respond to this Form.
Recipients Only : Only recipients of this Form are allowed to respond to this Form.
Continue Discussion: Select 'Yes', if you want to continue the message discussion on this Form type. Select 'No' otherwise.
Enable Draft Responses: Select 'Yes', if you want to allow responses to be saved as Draft. Select 'No' otherwise.
Show Responses:
Always : Enables users to see the response information always i.e. even when the form is open as well as once the form is closed.
On Form Close Out: Allows the users to see the response information only once the form is closed out. The response information is not available when the Form is Open.
![]() Allow Editing ORI Message: Select
this option if you want to allow all users having Create Form privilege
on this form type to edit original message. Select
'No' otherwise.
Allow Editing ORI Message: Select
this option if you want to allow all users having Create Form privilege
on this form type to edit original message. Select
'No' otherwise.
Allow Import in Edit ORI: Select 'Yes', if you want to allow import of data while editing of ORI message. Select 'No' otherwise.
5. Select the Action you want to assign to the Form along with predefined number of days to complete the Actions. Also specify the Default Action Required as well.
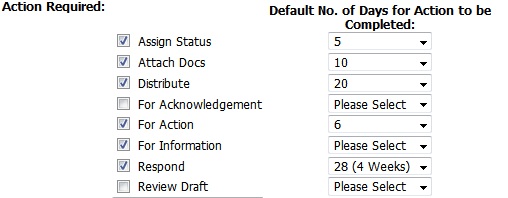
Please note that any changes made in this Form setting will also be applied to past form instances.
6. Distribution and Associations:
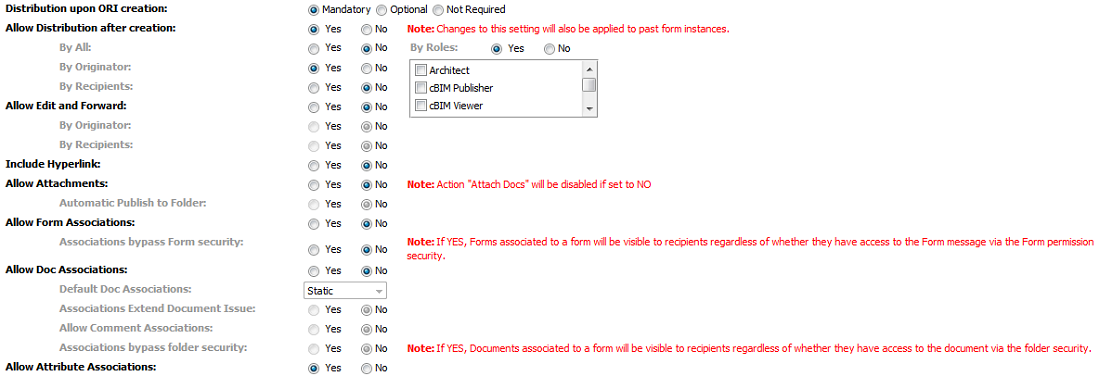
![]() Distribution upon ORI creation:
Distribution upon ORI creation:
Mandatory: It will make standard distribution of the message mandatory for users while creating or responding.
Optional: It will make standard distribution of the message optional for users while creating or responding. Users will need to click on Distribute button to enable the "To" field on Form.
Not required: It will allow the users to create or respond without manually distributing the message.
![]() Allow Distribution after creation:
Enable users to distribute the ORI message after creating the Form message.
Users can also set permission for all users or Originator or Recipients
or Users in selected role/s, to allow distribution of the created message
for this Form type.
Allow Distribution after creation:
Enable users to distribute the ORI message after creating the Form message.
Users can also set permission for all users or Originator or Recipients
or Users in selected role/s, to allow distribution of the created message
for this Form type.
Please note that any changes made in this Form setting will also be applied to past form instances.
![]() Allow Edit and Forward: Allow
users to edit and forward the created message for this Form type. Users
can also set permission for Originator and Recipients to edit and forward
the created message for this Form type.
Allow Edit and Forward: Allow
users to edit and forward the created message for this Form type. Users
can also set permission for Originator and Recipients to edit and forward
the created message for this Form type.
![]() Include Hyperlink: Enable users
to add a hyperlink field within the Form fields. This field will be disabled
for AppBuilder Form.
Include Hyperlink: Enable users
to add a hyperlink field within the Form fields. This field will be disabled
for AppBuilder Form.
![]() Allow Attachments: Allow users
to attach external documents with the Form message. Users can also publish
the same external document to workspace folder by selecting 'Yes' for
field 'Automatic Publish to Folder'. Users will have to specify the folder
path to publish external document on workspace.
Allow Attachments: Allow users
to attach external documents with the Form message. Users can also publish
the same external document to workspace folder by selecting 'Yes' for
field 'Automatic Publish to Folder'. Users will have to specify the folder
path to publish external document on workspace.
![]() Allow Form Associations: Enable
users to associate any existing Form, where the user has access to, to
the current Form. User can also define the permissions for associated
Forms to bypass the Form security or continue with it.
Allow Form Associations: Enable
users to associate any existing Form, where the user has access to, to
the current Form. User can also define the permissions for associated
Forms to bypass the Form security or continue with it.
![]() Allow Doc Associations: Allow
users to associate documents where the user has access to, to the current
Form. Users can set association link to be dynamic or static. Users also
have an option to extend the association to document issues and comments.
Allow Doc Associations: Allow
users to associate documents where the user has access to, to the current
Form. Users can set association link to be dynamic or static. Users also
have an option to extend the association to document issues and comments.
User can also define the permissions for associated Documents to bypass the Folder security or continue with it.
![]() Allow View Associations:
Allows users to associate model views with this Form type.
Allow View Associations:
Allows users to associate model views with this Form type.
![]() Allow Attribute Associations:
Allows users to associate attributes to this Form type.
Allow Attribute Associations:
Allows users to associate attributes to this Form type.
7. Overall Form Status.

![]() Select "Yes" against Overall Form Statuses to enable applying
Status to the form type.
Select "Yes" against Overall Form Statuses to enable applying
Status to the form type.
![]() If "Closes Out the Form" is marked ON against a Form Status,
the form instance will be closed when the respective Status is applied/selected.
If "Closes Out the Form" is marked ON against a Form Status,
the form instance will be closed when the respective Status is applied/selected.
Please note that any changes made in this Form setting will also be applied to past form instances.
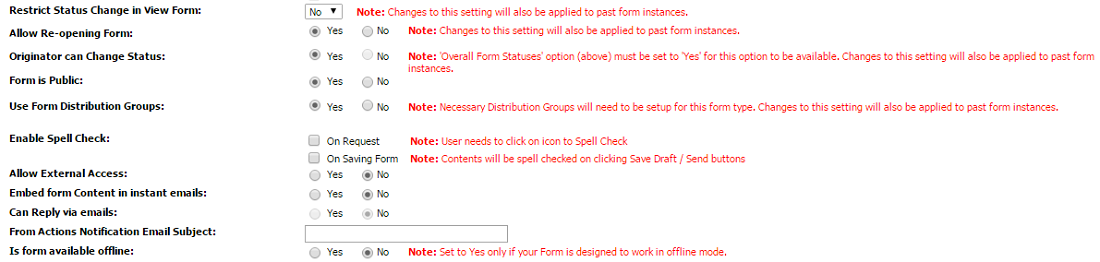
![]() Restrict
Status Change in View Form: If
this form permission is set to YES you will not be able the change the
status of a form while viewing it AND by selecting multiple forms in form
listing page even if you have Can Batch Status Change – All Forms &
Can Batch Status Change – Own Forms role privileges. Additionally, you
cannot Re-Open Closed Forms while viewing them and by selecting multiple
forms in form listing page even if you have Can Re-Open All Closed Forms
– Admin & Can Re-Open Closed Forms role privileges.
Restrict
Status Change in View Form: If
this form permission is set to YES you will not be able the change the
status of a form while viewing it AND by selecting multiple forms in form
listing page even if you have Can Batch Status Change – All Forms &
Can Batch Status Change – Own Forms role privileges. Additionally, you
cannot Re-Open Closed Forms while viewing them and by selecting multiple
forms in form listing page even if you have Can Re-Open All Closed Forms
– Admin & Can Re-Open Closed Forms role privileges.
If this permission is set to NO then you can change form status as per the role privileges you have. Essentially this means Form Settings override the Role Privileges.
![]() Allow Re-Opening Form: Enable
users to reopen the closed Form. This permission will overwrite 'Can re-open Closed Forms' User Privilege
for this Form type.
Allow Re-Opening Form: Enable
users to reopen the closed Form. This permission will overwrite 'Can re-open Closed Forms' User Privilege
for this Form type.
Please note that any changes made in this Form setting will also be applied to past form instances.
![]() Originator can change Status:
Allows Originator of the Form to change the status of the Form instance.
The App settings shall now allow Administrators
to enable / disable the “Originator can Change Status” settings even for
Non-Controller based forms.
Originator can change Status:
Allows Originator of the Form to change the status of the Form instance.
The App settings shall now allow Administrators
to enable / disable the “Originator can Change Status” settings even for
Non-Controller based forms.
Please note that any changes made in this Form setting will also be applied to past form instances.
![]() Form is Public: Enables users
to create Private or Public instance for this Form type.
Form is Public: Enables users
to create Private or Public instance for this Form type.
![]() Use Form Distribution Groups:
Allows users to use Form Distribution Group to distribute the messages
for this Form type.
Use Form Distribution Groups:
Allows users to use Form Distribution Group to distribute the messages
for this Form type.
Please note that any changes made in this Form setting will also be applied to past form instances.
![]() Enable Spell Check: Allow users
to perform spell check while saving or creating the Form messages.
Enable Spell Check: Allow users
to perform spell check while saving or creating the Form messages.
![]() Signature box include in print view:
Enables users to include signature in print view. It is available in the
Basic Form Type however for Custom (AppBuilder Form) and custom options
are possible.
Signature box include in print view:
Enables users to include signature in print view. It is available in the
Basic Form Type however for Custom (AppBuilder Form) and custom options
are possible.
![]() Allow External Access: Enables
users to generate external access URL for the Form instance via a hyperlink
which will be displayed within each Form instance.
Allow External Access: Enables
users to generate external access URL for the Form instance via a hyperlink
which will be displayed within each Form instance.
![]() Embed Form Content in instant emails:
Allows users to embed Form content in email notifications. Users have
to specify the Form Content in emails should available for All users or
for External users only. For more details please click
here.
Embed Form Content in instant emails:
Allows users to embed Form content in email notifications. Users have
to specify the Form Content in emails should available for All users or
for External users only. For more details please click
here.
![]() Can reply via emails: Allows users
to create response to Form via email.
Can reply via emails: Allows users
to create response to Form via email.
![]() Form Actions Notification email Subject:
Enables users to customize the subject of notifications email. For more
details please click
here.
Form Actions Notification email Subject:
Enables users to customize the subject of notifications email. For more
details please click
here.
![]() Is form available offline:
Select 'Yes' only if your Form is designed to work in offline mode. Select
'No' otherwise.
Is form available offline:
Select 'Yes' only if your Form is designed to work in offline mode. Select
'No' otherwise.
8. Click on Submit to save the Form settings.
FAQ's:
Q: I want to change the Response type of the Custom Form to “Multiple Response” but the radio button is disabled.
A: To change the Response type to “Multiple Response” you need to publish the Form template again. Select a template file (.xsn) file by clicking on the Browse button, and the option for “Multiple Response” will then be enabled for you to select.
Q: I want to mark the setting of User Ref, Include Hyperlink and Display Signature as ON but I cannot see the settings.
A: You must be trying to change the settings of a Custom Form Template. You do not have options to set the setting of the mentioned criteria for Custom Forms. You need to include these fields directly in the Custom Form Template design.
Q: I am trying to upload a Custom Form Template but I get an error informing that the selected Form Template is not valid.
A: A Custom Form template needs to be designed to fulfil certain criteria. Change the design of the Custom Form template for the mentioned reason and upload it again or contact Asite Support for help.
Q: I am trying to send a custom form message but I keep on getting the error that the form contains some validation errors.
A: When you enter values in your custom form and send the message the errors are marked with either a red asterisk (required fields) or red, dashed border (invalid values). Modify the values as required and send the message again.
Q: I want to have a 5 character prefix before the Form Number in the Form Id.
A: You can have a maximum of 4 and minimum of 3 character prefix before the Form Number and you can specify it in the Form Group Code setting.
Q: I do not see the Form Template type to select the Order form
A: You will be able to mark the Form Template type as Order form only in Procurement Manager Workspace
Q: I do not see the Form Template type to select the Invoice form
A: You will be able to mark the Form Template type as Invoice form only in Procurement
Manager Workspace
Q: I want the users to refrain from distributing the form messages
A: Mark the setting of "Allow Distribution" to Not Required
Q: I want the users to Allow editing the ORI message
A: The setting of "Allow Editing ORI Message" needs to be marked as "Yes" in order to allow the users to edit the ORI message
Q: I want the users to Allow editing the ORI message but the "Allow Editing ORI Message" setting remains disabled.
A: The setting of "Allow Editing ORI Message" is only enabled if:
a) The form is a Non Controller based form AND
b) Allow Responses is set to OFF AND
c) Allow Forwarding is set to OFF
Useful Links:
Cross Workspace Linking of Forms
Import XLS file to the form on creation
Import XML file to the form on creation