Users now have the additional flexibility to email in an XLS file to automatically create a new form message within the Workspace.
Form Settings:
The Administrator will need to specify within the Form Settings if the Form Type will support Email In XLS. Additionally, for XML, the relevant XSLT file will also need to be uploaded to the Form Type.
Steps to use this functionality are:
![]() Select “Forms – Manage Workspace settings” option in Admin menu.
Select “Forms – Manage Workspace settings” option in Admin menu.
![]() Select f “Enable
XML / XLS file Import, Email-In” option and mark it as YES.
Select f “Enable
XML / XLS file Import, Email-In” option and mark it as YES.
![]()
![]() Click on Submit
to save the new settings.
Click on Submit
to save the new settings.
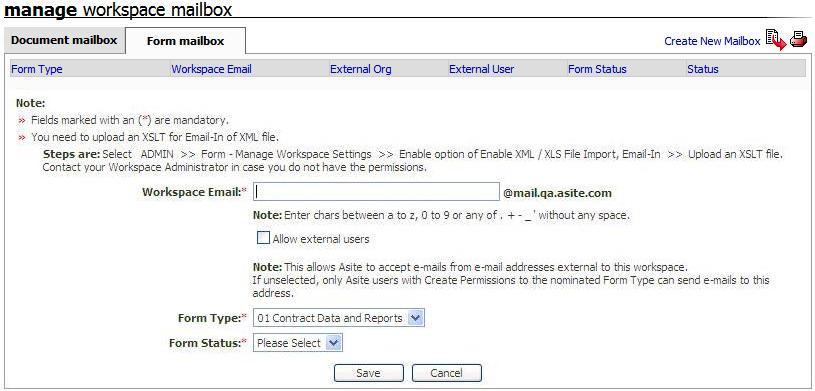
This functionality is supported by creating a new Form Mailbox.
Form Mailbox:
Click on “Form Mailbox” in ADMIN option– “Manage Workspace Mailbox”

![]() Click “Create new Mailbox” link to create a new
mailbox
Click “Create new Mailbox” link to create a new
mailbox

![]() Specify required details
Specify required details
![]() Click on Save
button to save the form mailbox.
Click on Save
button to save the form mailbox.
To facilitate Email-in from External users.
![]() Select “Allow External Users” checkbox and select the user
who will be the Form Originator
Select “Allow External Users” checkbox and select the user
who will be the Form Originator

Exceptions:
The following exception scenario’s are being considered and handled. The Email sender will be notified by an email notification with respect to the reason for failure
# |
Scenario |
Validation Reason |
1 |
Workspace Status for the specified form mailbox is set to “Closed” |
The Workspace containing the Form Mailbox is inactive. Please contact your Workspace Administrator. |
2 |
User is now marked inactive on specified Workspace |
You are not an active user on the workspace. Please contact your Workspace Administrator |
3 |
The Form Type associated with the Form Mailbox is not active |
The form configured with the mailbox is deactivated on the Workspace. Please contact your Workspace Administrator |
4 |
The specified Form Mailbox is not active |
The specified form mailbox is not active. Please contact your Workspace Administrator |
5 |
The Form Setting of “Allow Import ..” is disabled for the specified Form Mailbox |
Form settings are not enabled. Please contact your Workspace Administrator |
6 |
The For Type for the specified Form Mailbox is a Controller based Form |
The Form Type associated with this mailbox does not support Email in. Please contact your Workspace Administrator. |
7 |
The XLS file not contain information for “Respond By” date |
"Respond By" date is not specified. Please update and try again or contact your Workspace Administrator. |
8 |
User sending XLS file does not have Create Form permission assigned for the Form Type |
You do not have permission to create a form message. Please contact your Workspace Administrator |
9 |
The limit for Form Creation has exceeded for the specified Form Type |
The limit for Form Instances has exceeded. Please contact your Workspace Administrator |
10 |
The Form Setting of “Enable XML / XLS File Import, Email-In” OR, XSLT is not configured for the Form Type |
Invalid XSLT file uploaded. Please contact your Workspace Administrator. |
11 |
The specified Form Status does not match with the Form Type and Form Mailbox |
Selected form status is not valid. Please contact your Workspace Administrator. |
12 |
The attached XML file is not well formed |
Invalid xml file attached. Please contact your Workspace Administrator. |
13 |
The XLS file contains restricted characters in Form Title |
Invalid characters are included in file. Please update and try again. |
14 |
Attached file is not XML / XLS file type or attachment is missing |
You have not attached any XML / XLS with this email |
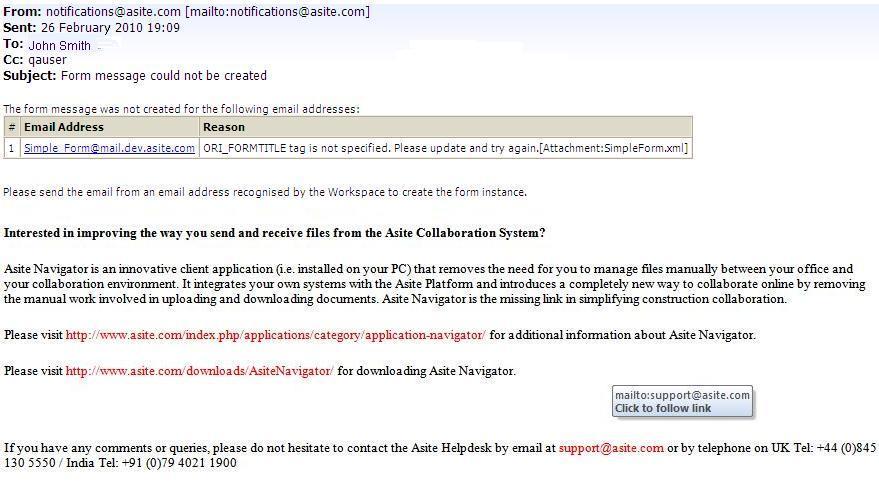
Sample Email Notification for failure to create Form Message is stated below:

Note:
Only those form statuses which are assigned to the Form Type will be available for selection.
For forms which have setting of “Overall Form Status” set to NO, the Form Status field will be available but non-mandatory.
Useful Links:
Manage Form Settings within Workspace
Cross Workspace Linking of Forms
Import XSL file to the form on creation