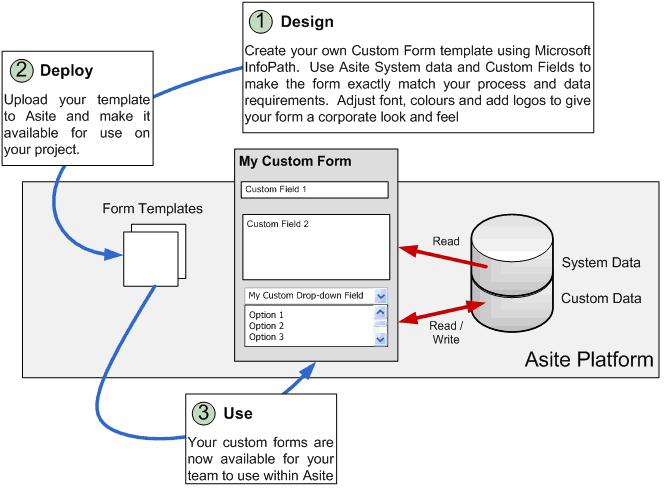
Asite's workflow manager module allows you to create forms for any processes your team or Workspace need to track and control. Rather than sending word versions of forms via e-mail or using paper based form, it's easy to design, deploy and use forms within Asite.
From requests for information, change orders, NEC3 forms, timesheets, holiday requests and applications for payment; the list of processes and information that you can collect and manage in Asite is endless.
If you have Microsoft office, you too can customise and design forms to use in Asite! You can even take your existing word or paper forms and convert them for use in Asite using the Microsoft InfoPath form designer!
No matter how complex your form, it can be replicated. You can add custom fields, drop-down lists, radio buttons and even do calculations and summaries. You can give your forms a corporate look and feel. The choice is yours.
1. The InfoPath Form Template
Custom Forms are generated in Asite from Microsoft InfoPath .xsn files. Within the XSN file there are a number of “Design Tasks” which define how the form looks and works.
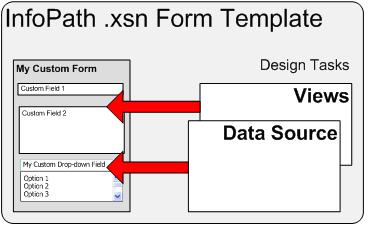
The Key Design Tasks are Data Source, which defines the data collected and displayed within a form, and Views which are input and display representations of the data stored within the data source.
A standard Custom Forms Template has been created with pre-defined views and data sources for all Asite System Data fields so you can just add your custom fields. The template can be downloaded from the following location: Template or we can just provide it via a form template in Asite.
If you wish to design a form from scratch, or start with an Word / PDF form imported into InfoPath, you can also use this guide to create the required views and fields for the form to work within Asite.
1.1 Design Task – Views
To use the InfoPath Views in Asite, you will need to name them in a certain manner. The table and diagram below details all of the views that can be used in Asite; and how and when these are presented to the users.
Dependent on whether your form will require responses or not, you will need to have views for response messages. You can also decide whether you will have combined, or multiple responses. If you only want one response, and allow multiple people to add to/amend existing responses then use a combined response form. If you would like multiple responses to be added to the form, then use a multiple response form.
Whether you use a combined or multiple response form is set within Asite when you upload the template, but you will need to provide the correct views within the XSN file to match the settings.
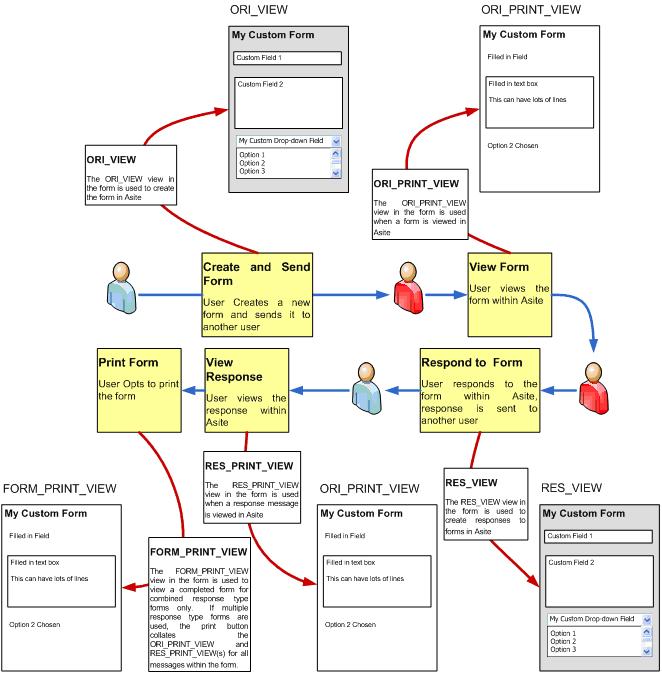
Table 1: Views for Combined Response Forms
View Name |
Mandatory? |
How is the view used in Asite |
ORI_VIEW |
Yes |
Will be rendered when a user creates a new Form (ORI message) or a FWD message |
RES_VIEW |
Yes (if response is required) |
Will be rendered when a user creates a new Response (RES message) |
ORI_PRINT_VIEW |
No |
Will be rendered when a user views a ORI message or a FWD message in the View Form Page & also when a user wants to print an ORI or individual FWD message |
RES_PRINT_VIEW |
No |
Will be rendered when a user views a RES message in the View Form Page & also when a user wants to print an individual RES message |
FORM_PRINT_VIEW |
No |
Will be rendered when a user prints a Form (Form Print View) |
Table 2: Views for Multiple Response Form
View Name |
Mandatory? |
How is the view used in Asite |
ORI_VIEW |
Yes |
Will be rendered when a user creates a new Form (ORI message) or a FWD message |
RES_VIEW |
Yes |
Will be rendered when a user creates a new Response (RES message) |
ORI_PRINT_VIEW |
No |
Will be rendered when a user views a ORI message or a FWD message in the View Form Page & also when a user wants to print an ORI or individual FWD message
Will also be rendered at the top of a Form Print View when the user prints the entire form |
RES_PRINT_VIEW |
No |
Will be rendered when a user views a RES message in the View Form Page & also when a user wants to print an individual RES message
Will also be rendered for each RES message in the Form Print View when the user prints the entire form |
1.2 Design Task – Mobile Views
To use the InfoPath Views in Mobile Application, you will need to name them in a certain manner. The table and diagram below details all of the views that can be used in Asite; and how and when these are presented to the users.
Dependent on whether your form will require responses or not, you will need to have views for response messages. You can also decide whether you will have combined, or multiple responses. If you only want one response, and allow multiple people to add to/amend existing responses then use a combined response form. If you would like multiple responses to be added to the form, then use a multiple response form.
Whether you use a combined or multiple response form is set within Asite when you upload the template, but you will need to provide the correct views within the XSN file to match the settings.
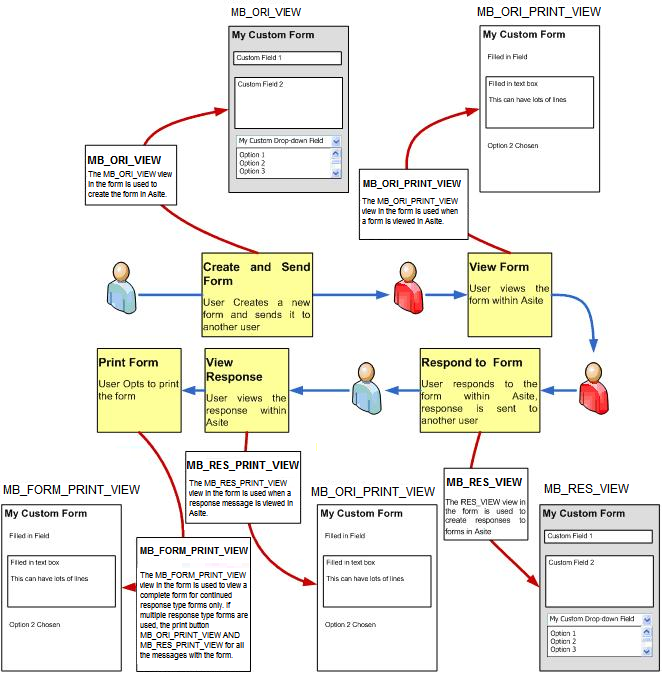
Table 1: Views for Combined Response Forms
View Name |
Mandatory? |
How is the view used on Mobile |
MB_ORI_VIEW |
Yes |
Will be rendered when a user creates a new Form (ORI message) or a FWD message |
MB_ORI_PRINT_VIEW |
Yes (if response is required) |
Will be rendered when a user creates a new Response (RES message) |
MB_RES_VIEW |
No |
Will be rendered when a user views a ORI message or a FWD message in the View Form Page & also when a user wants to print an ORI or individual FWD message |
MB_RES_PRINT_VIEW |
No |
Will be rendered when a user views a RES message in the View Form Page & also when a user wants to print an individual RES message |
MB_FORM_PRINT_VIEW |
No |
Will be rendered when a user prints a Form (Form Print View) |
Table 2: Views for Multiple Response Form
View Name |
Mandatory? |
How is the view used on Mobile |
MB_ORI_VIEW |
Yes |
Will be rendered when a user creates a new Form (ORI message) or a FWD message |
MB_RES_VIEW |
Yes |
Will be rendered when a user creates a new Response (RES message) |
MB_ORI_PRINT_VIEW |
No |
Will be rendered when a user views a ORI message or a FWD message in the View Form Page & also when a user wants to print an ORI or individual FWD message
Will also be rendered at the top of a Form Print View when the user prints the entire form |
MB_RES_PRINT_VIEW |
No |
Will be rendered when a user views a RES message in the View Form Page & also when a user wants to print an individual RES message
Will also be rendered for each RES message in the Form Print View when the user prints the entire form |
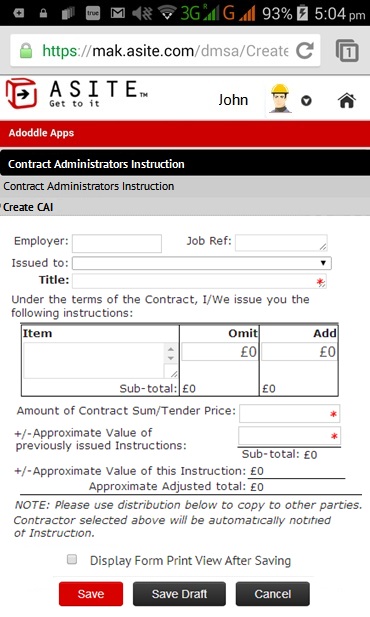
Mobile displays the form view as displayed below.
1.3 Design Task - Data Structure
Each form template contains a Data Structure. When you use forms within Asite, you can read certain data fields from Asite into your form (Asite System Data) to form part of your Data Structure. You can also of course add any number of custom data fields to capture and share data within Asite.
A full list of all of the Asite system data fields that can be referenced within your custom form can be found in Appendix A.
A guide to how to create additional fields in the template or add in Asite System Data fields to an existing form can be found in Section 2.
1.4 Data task – Controls
Controls allow you to collect or display data stored within the “Data Structure” of the Form on one of the “Views”. For example you could have a drop-down menu to allow a user to choose an option on a data entry view (i.e. ORI_VIEW / MB_ORI_VIEW for mobile views) and an expression or text box to display a read-only version on the data on as display view (i.e. ORI_PRINT_VIEW / MB_ORI_PRINT_VIEW).
2. Creating Fields in the InfoPath Form Template
![]() Navigate to Data Source Task Pane
Navigate to Data Source Task Pane
![]() Right click and select Add
Right click and select Add
![]() Name
the field according to your own standards
Name
the field according to your own standards
![]() Select Type
as Field (element)
Select Type
as Field (element)
![]() Select an appropriate Data
type for your filed
Select an appropriate Data
type for your filed
![]() Click on OK
Click on OK
Repeat the above steps to define as many custom fields as required for the Custom Form.
3 Creating Views in the InfoPath Form Template
![]() Follow the below mentioned steps to define
all the required views as per the section 1.1
Follow the below mentioned steps to define
all the required views as per the section 1.1
1. In design mode, click Manage Views on the View menu.
2. In the Views task pane, do the following:
To add a new view, click Add a New View under Actions, and then in the Add View dialog box, type a name for the new view.
![]() Add
required fields in ORI_VIEW /
MB_ORI_VIEW
Add
required fields in ORI_VIEW /
MB_ORI_VIEW
Add all the fields that you want the user to enter when a new Instance of a form is submitted. This will be the fields that the Sender of a Form will define before sending a form to another user.
1. Navigate to ORI_VIEW / MB_ORI_VIEW
2. Insert a text box field pointing to the ORI_FORMTITLE field.
3. Insert other fields required in the ORI view from the data source
Notes:
It is mandatory to define a field with name ORI_FORMTITLE in the ORI_VIEW / MB_ORI_VIEW or else the system won't accept the form when uploaded to Asite.
If the field ORI_FORMTITLE is not marked as mandatory, the users will still have to mandatorily enter values when an instance is created.
Use a Text Box control if you do not want the ability for users to enter any line feeds.
Use Rich Text Box control if you want the ability for users to enter line feeds.
It is recommended to set the Scroll automatically while typing property as ON (after setting the Wrap Text Property ON) for each of the text boxes used on the form.
You should not include the “Respond By” date field in your form design. It will be automatically shown based on the settings at the time of creating form instance.
If you are designing a Controller based form, then you should not include the Controller dropdown in your form design. Controller dropdown will be displayed automatically while creating form instance.
ORI View can be saved as a Draft within Asite Collaboration application.
For complete list on the recommended controls to be used in a design of a form to be used with Asite Collaboration application refer Appendix A
![]() Add required fields in RES_VIEW
/ MB_RES_VIEW
Add required fields in RES_VIEW
/ MB_RES_VIEW
Add all required fields that you want the user to enter when a Response message is created. This will be the fields that the Responder of a Form will define before sending a response to another user.
1. Navigate to RES_VIEW / MB_RES_VIEW
2. Insert other fields required in the RES view from the data source
![]() Set the properties of the
fields added to the View
Set the properties of the
fields added to the View
Set the required properties for the fields that you have added to the view. You can set properties like weather the field is mandatory or not, max length of the field etc. The following properties are mandatory to be defined:
1.Set the Limit text box to property of the field ORI_TITLE to 100
2.Set the Cannot be blank property of field ORI_TITLE as ON
3.Set the Limit text box to property of the field ORI_USERREF to 50
Notes:
If you do not set the limit of any of the above defined fields, the data will be truncated to max 100 and 50 characters for Form Title and User Ref fields.
Enable spelling checker & Enable AutoComplete properties will not work even if they are set as ON.
AppBuilder forms can be saved as draft responses within the System.
![]() Set the ORI_PRINT_VIEW / MB_PRINT_VIEW
Set the ORI_PRINT_VIEW / MB_PRINT_VIEW
Define the ORI_PRINT_VIEW / MB_PRINT_VIEW to display the data that will be displayed when the user clicks on an ORI message OR Forward [FWD] message in the message tree in the View Form Page
1.Navigate to the ORI_PRINT_VIEW / MB_ORI_PRINT_VIEW
2.Prepare a layout in which you want the data to be displayed in the ORI_PRINT_VIEW / MB_ORI_PRINT_VIEW
3.Add an expression box control to display data of the fields defined for each of the field in ORI_VIEW / MB_ORI_VIEW
4.Point the expression box to the field for which the data is to be displayed in that expression box
Notes:
It is recommended to use the Expression box control for displaying data as it gives a flat look to the displayed data which is ideal for print views.
You can use the text boxes in the print views directly instead of pointing expression boxes. But then you will need to change the Read Only property of the text box as ON. Also you may need to remove the borders of the text boxes to give a flat look to the print view.
Expression boxes do not handle line feeds. So if you have used a control that allows line feeds (e.g. Text box or Rich text box) to be entered, it is recommended to directly copy the control to the Print View and then make it Read Only instead of using an expression box for that control.
In case of Multiple Response forms it is useful to define the header at the top of the ORI_PRINT_VIEW / MB_ORI_PRINT_VIEW. This is because when the user views the Form Print View, the ORI_PRINT_VIEW / MB_ORI_PRINT_VIEW will be rendered at the top.
Also define the layout as the one required when the user prints the form
It is necessary to explicitly assign required fonts and fonts size for each control.
![]() Set the RES_PRINT_VIEW / MB_RES_PRINT_VIEW
Set the RES_PRINT_VIEW / MB_RES_PRINT_VIEW
Define the ORI_PRINT_VIEW / MB_ORI_PRINT_VIEW to display the data that will be displayed when the user clicks on a RES message in the message tree in the View Form Page
1.Navigate to the required RES_PRINT_VIEW / MB_RES_PRINT_VIEW
2.Prepare a layout in which you want the data to be displayed in the RES _PRINT_VIEW / MB_RES_PRINT_VIEW
3.Add an expression box control to display data of the fields defined for each of the field in RES_VIEW / MR_RES_VIEW
4. Point the expression box to the field for which the data is to be displayed in that expression box
Notes:
In case of Multiple Response forms it is useful to define the header at the top of the RES_PRINT_VIEW / MB_RES_PRINT_VIEW. This is because when the user views the Form Print View, the ORI_PRINT_VIEW / MB_ORI_PRINT_VIEW will be rendered at the top.
Also define the layout as the one required when the user prints the form
![]() Define the FORM_PRINT_VIEW
Define the FORM_PRINT_VIEW
Define the FORM_PRINT_VIEW to display the data that will be displayed when the user views the Form Print View of the selected form
1.Navigate to the FORM_PRINT_VIEW
2.Prepare a layout in which you want the data to be displayed in the FORM_PRINT_VIEW
3.Add a text box control for each of the system metadata (i.e. the one stored for a form in the database) that is required to be displayed in any of the Print View
4.Add an expression box control to display data of the fields that need to be displayed in the FORM_PRINT_VIEW
5.Point the expression box to the field for which the data is to be displayed in that expression box
Notes:
If you want to use an image in your form (for e.g. Company Logo) then you need to insert the image at the required location in the layout.
It is recommended not to use the Picture control
It is recommended to set the Print Background and Images setting in IE as ON
Appendix A
Data Fields within Group: Asite_System_Data_Read_Only
Click here for details of fields that are available within this template to read data from within Asite and display in views that are created within your custom form. Please copy the display controls can paste them onto your views.
FAQs
Q: I want to download a Custom Form Template to add new fields.
A: You can download a Custom Form Template from the “Forms Assign to Workspace” page or from the “Forms Manage Workspace Settings” page by clicking on the download icon against the required Custom Form Template.
Q: I want to download a Custom Form Template but I do not see any download icon against the Form Template.
A: You must be trying to download a basic form template. Download icon is only displayed against a Custom Form Template.
Q: I want to change the Response type of the Custom Form to “Multiple Response” but the radio button is disabled.
A: To change the Response type to “Multiple Response” you need to upload the Form template again. Select a template file (.xsn) file by clicking on the Browse button, and the option for “Multiple Response” will then be enabled for you to select.
Q: I want to mark the setting of User Ref, Include Hyperlink and Display Signature as ON but I cannot see the settings.
A: You must be trying to change the settings of a Custom Form Template. You do not have options to set the setting of the mentioned criteria for Custom Forms. You need to include these fields directly in the Custom Form Template design.
Q: I am trying to upload a Custom Form Template but I get an error informing that the selected Form Template is not valid.
A: A Custom Form template needs to be designed to fulfil certain criteria. Change the design of the Custom Form template for the mentioned reason and upload it again or contact Asite Support for help.
Q: I am trying to send a custom form message but I keep on getting the error that the form contains some validation errors.
A: When you enter values in your custom form and send the message the errors are marked with either a red asterisk (required fields) or red, dashed border (invalid values). Modify the values as required and send the message again.
Q: I want to print an individual Form message but I cannot see the icon against the form message. But for another form I was able to print an individual form message.
A: You must be trying to print an individual message of a Basic Form. Option of printing individual form messages is only available for Custom Forms.
Q: I want to view the Form Print View of a Custom Form but I am not able to see the Print Icon at the top of the page. But for another form I was able to click on the Print Icon.
A: You must be the Originator of the Form you are trying to print & the form must be a Controller based form with “Response Type” form setting as “Combined”. The Form Print view of such type of custom forms is only available once the form is closed.
Q: I want to print the appendices of a form separately but I do not get any popup to select the appendices that I want. But for another form I got the appendices selection popup.
A: You must be trying to select appendices option of a basic form. Option to select the appendices is only available for Custom Forms.
Q: I had designed a custom form template to have a different Form Print View. But my Form Print view is coming out as a combination of the ORI Print View and the RES Print View that I had designed.
A: You must be trying to see the Form Print View of a Custom Form with Response Type as “Multiple Response”. The Form Print view can only be designed separately for Custom Forms with Response Type as “Combined Response”.
Q: I had designed a Custom Form template Form Print View to display Message Id, Message Creator, Message Date, Message Status and Message Response date. But I do not get values in these fields.
A: You must be trying to view these fields for a Custom Form with Response type as Combined Response. These system metadata fields can only be used with a Custom Form with Response type as Multiple Response.
Q: I want to search for some value entered against a field in one of my Custom Fields but I cannot see the name of the field in the advanced search criteria.
A: To search for any of the values entered in fields of a Custom Form you need to specify the value in the “Form Content” criteria. It will display all the Custom Forms which match the entered criteria in any of the custom fields.
Useful Links:
Accessing API functions from AppBuilder forms