A variety of file types may be published into selected folders within a "Workspace". These include Word, Excel and drawing files such as DWF and PLT files.
Note :The following upload / publish process will be available if User Preference is set to Standard Upload.
Upload / Publish also provides the user with an ability to notify recipients of documents.
Below are the steps to upload files with attributes from user interface:
1. Select Folder to upload into.
2. Click on the ![]() icon
and select Publish
Standard Document.
icon
and select Publish
Standard Document.
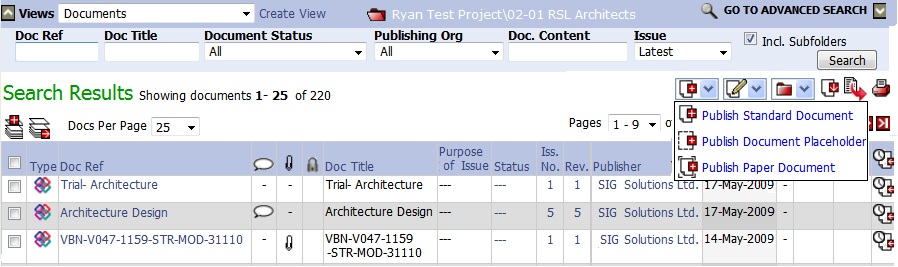
3. A layered page will appear.
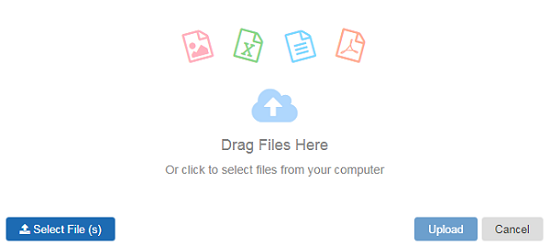
4. Select the files to be uploaded and drag them to the upload area or click 'Select Files' button to browse and select required files.

5.
Attributes are already selected and you can click  icon to copy the file name as doc title.

6. You will
need to enter the value for mandatory attributes (document reference,
revision number, document title, purpose of issue and status). Click on
 icon to select existing document reference.
Custom Attributes - You can capture the custom attributes for a file here.
Hierarchial Attributes - You can capture the custom hierarchial attributes for a file here.
7. You can
click  icon to apply
same value of an attribute to multiple files.
icon to apply
same value of an attribute to multiple files.

8. Fill all mandatory values and click on 'Apply To All' button to apply entered values to all attributes of selected files.
9. You can
apply value to particular attribute through bulk apply by just clicking
on  icon. By clicking on icon, values of particular attribute will
get applied to all selected files.
icon. By clicking on icon, values of particular attribute will
get applied to all selected files.
Note: Bulk apply works only when the fields are empty, if there are other
values for any file attributes which you need to overwrite, keep the 'Apply
to All' box empty and click on
. This will blank out the field for all files, now you can enter
required value in 'Apply to All' box and click
.
10. Click on 'Upload' to upload files with attributes. To distribute a file before upload, click here for detailed help.
11. The activity center displays the progress of file upload/s. Activity center screen automatically closes once all the files are uploaded successfully.
12. In case, selected files already exist in the folder then all the attributes will be automatically pre-populated. The attributes will be included in the upload of the revision.
Below are the steps to upload files with attributes using 'Import from Excel':
1. Select Folder to upload into.
2. Click on the ![]() icon
and select Publish
Standard Document.
icon
and select Publish
Standard Document.
3. A layered page will appear.
4. Select the files
to be uploaded and drag them to the upload area or click 'Select Files'
button to browse and select required files.
Upload
of file revisions may depend upon whether the 'Revision Upload' activity
is locked or unlocked for the existing file (with same doc ref). While
uploading multiple files at a time, the files which have 'Revision Upload'
file activity locked will be filtered out automatically.
5.
Click on  icon to download MS excel template
for importing file attribute details and save it on your computer.
icon to download MS excel template
for importing file attribute details and save it on your computer.
6.
Open the downloaded excel template file. First sheet of the excel file
shows 'Notes' which gives the important information about uploading files.
7.
Capture required details of the files to be uploaded in the second sheet
- named 'Import-Data' and save the file.
8.
Return back to file upload screen of Adoddle.
9.
Click on  icon to upload the updated MS
excel file. The 'Import from Excel' screen will appear.
icon to upload the updated MS
excel file. The 'Import from Excel' screen will appear.
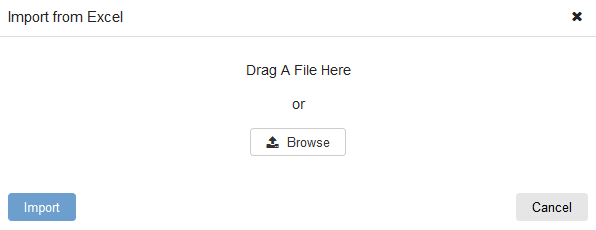
10.
Drag and drop the updated MS excel file or click 'Browse' to select the
file manually. Once done, click 'Import'.
11.
Details of the files captured in excel sheet are updated on the user interface.
Click on 'Select Files' to modify the file selection if required. You
can also edit the file attribute details directly from user interface
at this step.
12. Click on 'Upload' to upload files
with attributes.
13. The activity center displays the
progress of file upload/s. Activity center screen automatically closes
once all the files are uploaded successfully.
14. In case, selected files already exist in the folder then all the attributes will be automatically pre-populated. The attributes will be included in the upload of the revision.
Useful Links:
First Time Using Asite Collaboration
Publish Document & Drawings - Simple Upload
FAQ's:
Q: I want to specify “Action Due Date” and “Action Notes” while notifying users but the fields are disabled.
A: This feature is not available in the "Workspace"functionality. You need to upgrade to Workflow to gain access to this functionality.
Q. I am prompted to edit the Docref with some suggested values even if I have not applied any Number Checking Rule to the folder where I am publishing the file.
A. The default rule of the Workspace is applied to all the folders to which no other Rule is applied. The default rule if marked mandatory will prompt you to specify the Docref which is correct according to the default Number Checking Rule for the Workspace.
Q. The Doc Ref. I entered for a document does not match with the Rule that is applied to the folder, but I am not prompted to correct the Doc Ref..
A. You must have marked the Mandatory checkbox for the Rule as OFF. The Rule needs to be marked as Mandatory for you to prompt for the Doc Ref according to the Rule.
Q. I am no more able to publish Documents in the Tender Workspace folder (named as my company name), which I was able to do earlier.
A. On completion of close date of the Tender Workspace, only Tender Administrator is able to publish documents to the Tender folders. All other users can only view the documents. Your Tender workspace must have reached the Close Date.
Q: I marked the document as private while publishing but it is still available to some users who have not been distributed the document with action.
A: The users who have been assigned Admin permission on the folder that contains your document will also be able to view the private documents in the folder.
Q: A document which had external access is not accessible by external users who were earlier able to access the same document revision.
A: The external access of the document revision is removed once the document revision is marked as private. You will have to allow external access again after marking the document revision as public to let the external users access the document.