"Workflow Manager" provides team members with the ability to distribute information to other members of the Workspace team. Distribution groups can be set up and made available to all Workspace team members or specific organisations if required.
![]() Distribution Groups will be either “Document Only” or
“Form Only”, and will therefore only be able to be used when distributing Document or Forms respectively.
Distribution Groups will be either “Document Only” or
“Form Only”, and will therefore only be able to be used when distributing Document or Forms respectively.
![]() Form Only Distribution Groups will allow definition of default actions
and action times for each recipient defined within the distribution group.
Form Only Distribution Groups will allow definition of default actions
and action times for each recipient defined within the distribution group.
![]() Users will be able to define which form types the distribution can
be used with to force AppBuilder forms to use certain Workflows.
Users will be able to define which form types the distribution can
be used with to force AppBuilder forms to use certain Workflows.
All relevant distribution groups should be created on Workspaces / Workspace Templates using the following steps:
1. Login to Asite Collaboration
2. Select the ![]() menu
menu
3. Select Distribution – Assign to Workspace
4. Click on ![]() icon to add create a distribution group
icon to add create a distribution group

Document Distribution Group
![]() Enter
New Distribution Group Name
Enter
New Distribution Group Name

![]() Select
"Documents Only"
Group to create Document Distribution Group.
Select
"Documents Only"
Group to create Document Distribution Group.

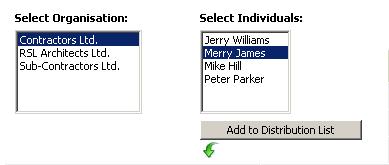
![]() Select
an organisation followed by the individuals you wish to add
Select
an organisation followed by the individuals you wish to add

![]() Click
on Add to Distribution
List
Click
on Add to Distribution
List
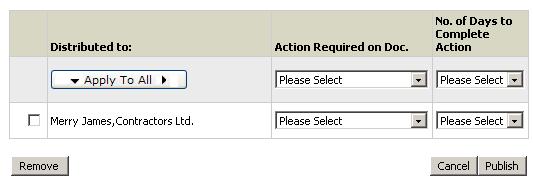
![]() Select
the Action Required
and Number of Days
for each user
Select
the Action Required
and Number of Days
for each user
During distribution, the calculation for number of days for action to be completed may be dependent upon working days and/or holidays defined in Working Calendar.

![]() Actions
required and Due by dates will be set as default each time the distribution
group is selected
Actions
required and Due by dates will be set as default each time the distribution
group is selected
10. Select Level Users / Organisations / Roles to assign access to the Distribution Group

11. Set Access Permission for the selected Users / Organisations / Roles

Form Distribution Group
![]() Enter New Distribution Group Name
Enter New Distribution Group Name

![]() Select
"Forms Only"
Group to create Forms Distribution Group.
Select
"Forms Only"
Group to create Forms Distribution Group.

![]() Select
an organisation followed by the individuals you wish to add
Select
an organisation followed by the individuals you wish to add

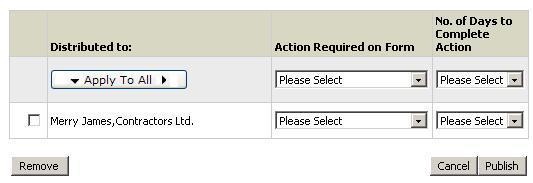
![]() Select the Action
Required and Number
of Days for each user
Select the Action
Required and Number
of Days for each user

![]() Actions required and Due by dates will
be set as default each time the distribution group is selected
Actions required and Due by dates will
be set as default each time the distribution group is selected
During distribution, the calculation for number of days for action to be completed may be dependent upon working days and/or holidays defined in Working Calendar.
![]() Select
appropriate Form Type
Select
appropriate Form Type

When creating “Form Only” Distribution Groups only those Form Type will the displayed for which Use Form Distribution Groups:” is set to Yes in Forms - Manage Workspace settings. If this setting is not enabled the form will continue to use the “Document Only” distribution groups

![]() .
Select Level Users / Organisations / Roles to assign access to the Distribution
Group
.
Select Level Users / Organisations / Roles to assign access to the Distribution
Group

11. Set Access Permission for the selected Users / Organisations / Roles
 .
.
![]() Access permissions give following access to the users
Access permissions give following access to the users
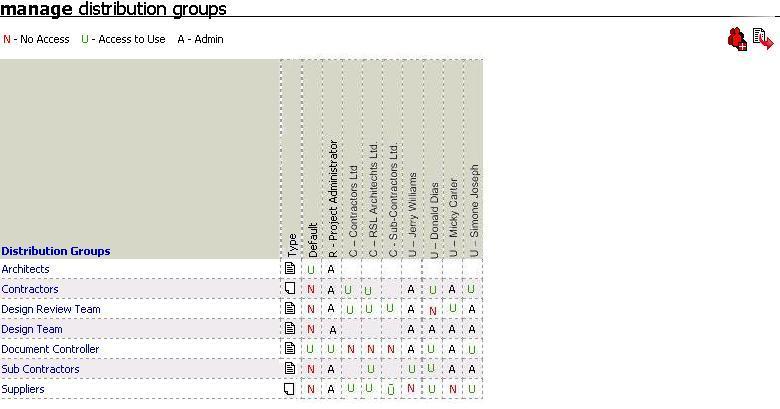
Permission |
Function |
N - No Access |
User will not have access to the Distribution Group |
U - Access to Use |
User will have access to the Distribution Group while editing distributing a document |
A - Admin |
User will have Admin access to the Distribution Group and will be able to assign access permissions for the Distribution Group to the Workspace users |
![]() Click on Add
Selected button besides the permission name to set permission for
the selected Users / Organisations / Roles.
Click on Add
Selected button besides the permission name to set permission for
the selected Users / Organisations / Roles.
![]() Selected Users / Organisations / Roles will be displayed in respective
columns for the row of the Permission selected
Selected Users / Organisations / Roles will be displayed in respective
columns for the row of the Permission selected
![]() Click on the
Click on the ![]() icon besides
the permission name to mark it as default permission
icon besides
the permission name to mark it as default permission
![]()
![]() specifies the default permission
specifies the default permission
11. Click on Submit button to confirm.
![]() The
Distribution Group will be added and will now be available to be used
while distributing documents.
The
Distribution Group will be added and will now be available to be used
while distributing documents.
12. Click on ![]() to edit/delete
distribution groups
to edit/delete
distribution groups
![]() Only creator of the distribution group can edit
/ delete the distribution group.
Only creator of the distribution group can edit
/ delete the distribution group.
Editing Distribution Groups:
The following lists the steps to manage Distribution Groups:
1. Select Distribution
- Assign to Workspace from the ![]() dropdown menu
dropdown menu

![]() Hover it on the Type icon to check whether its "Document Only"
Distribution or "Form Only" Distribution
Hover it on the Type icon to check whether its "Document Only"
Distribution or "Form Only" Distribution
2. Click on a Distribution Group to edit access permission

![]() Select Delete
this group? to delete a Distribution Group
Select Delete
this group? to delete a Distribution Group
2. Select check box besides Role / Organisations
/ User's names and click on remove button to remove the access permission
for the selected Role / Organisation / User.

3. Click on Submit to confirm
FAQs
Q: Some of the Distribution Groups, in the list on Distribution - Assign to Workspace page, are not hyperlinked. I am not able to manage the Access Permissions for those Distribution Groups.
A: You do not have Admin access to that Distribution Groups. You can manage the Access Permission for only those Distribution Groups to which you have Admin permission.
Useful Links: